

Almost 15 thousand years ago there was a story and repair of the electric steering rack www.drive2.ru/l/9043706/
There were many assumptions about the choice of material and the repair kit itself. They are all kinds of … Starting from the banal machined new bushings, to sophisticated solutions in the form of some kind of cylinders and clamps … I went along the path of machined bushings.
Then there were thoughts and debates about the choice of material www.drive2.ru/l/9123574/
I already forgot about all this, but the trouble, the grunts came back … Please do not immediately kick in the comments about the correctness or incorrectness of previously machined bushings, as today I consider fluoroplastic with coffee. friction in 0.04 is the best material in terms of resistance to natural wear, but not on our potholes as it turned out.
To say that it is worn out or something else was wrongly done or chosen — I will not! Everything was done correctly and did not please me for long 15 thousand km. Once again, I was going on a long journey. In a week I traveled 4,000 km and on the way home on the M2 highway, in the Oryol region in extreme darkness and on the road repair section, at a speed of 130-140 km per hour (no more) — I catch a rough drop in asphalt. It felt like a 10-15 transition … Honestly, the buttocks were huddled about thoughts about the consequences. Only by relaxing my ass and gaining speed again, I re-catch the same nonsense.
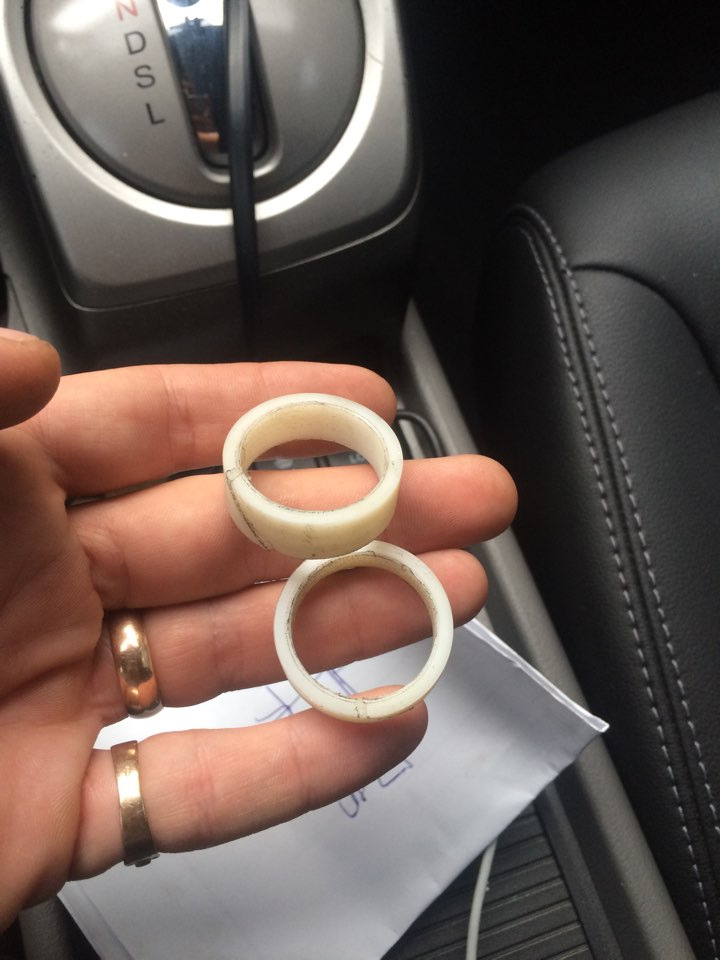
Upon returning to Kharkov, and having stopped at the next inspection of the car, the steering rack backlash was diagnosed on the right side. It is too early to talk about the reason, but based on the design of the rail, most likely the sleeve made of fluoroplastic has outlived its own))) A turner was immediately found and the bushings were made. This time from caprolon, but to establish and compare the difference in the future.
I want to remind once again that I made and manufactured:
1. Ftoroplast F4 — coffee. friction 0.04 — it was found
2. CAPROLON (POLYAMIDE PA-6) —
coffee friction 0.05 — will be established
I will not go further into the physicochemical properties. I want to note that the density of caprolon is greater.
It was for this reason that this time he made bushings from this material. And then the bitch, these pits and repairs, in the vast Slavic lands — the topic is inexhaustible! At first glance, the materials differ in color. The fluoroplastic is whiter and more elastic, while capralon is already scary to compress. It feels like it’s cracking now.
Bushings installed in 4 hours. I rented a lift from my friends for a hundred — this reduces the process in time by a lot)) The backlash and knock are gone. A new report has already gone to the capralon bushings.
There were some tips that I had not previously described. Perhaps facilitate the process.
1. Unscrew the hub from the drives and carefully move them to the side. I don’t know how it all counts on Civics, but on my CV joint it pops up easily and put back the tripod without removing the anthers, I didn’t succeed …
2. The grooved sleeve on the right and left sides must be installed so that the shaft passes through them with effort of hands! If the shaft cannot be pushed with your hands, then the dimensions of the sleeve are not correct. The shaft itself is installed from left to right and in the places where the bushings pass — a light hammer blow through the spacers.
3. In order that it would not be soared with shaft departures on both sides and safely disassemble and assemble, we can set the shaft in the center 2.5 turns (full speed almost 5 turns) and assemble everything back. I checked this collection twice — everything works. The main thing then put the steering wheel straight)
4. Collect all the bolts and nuts in boxes)))
If you have questions — ask! You can’t describe everything.


Краткое описание
Применяется для устранения стука в рулевой рейки со стороны пассажира.Установка производится БЕЗ снятия и разбора рулевой рейки.Втулка дублирует штатную втулку, тем самым принимая на себя нагрузку и устраняя стук.Как показала практика, ВСЕ электрические рулевые рейки на Honda Civic 8 поколения начинают стучать к 100 000 км.Менят. Читать полностью →
Процессор
| Диаметр вала | 26 мм |
- Описание
- Характеристики
- Отзывы (0)
Применяется для устранения стука в рулевой рейки со стороны пассажира.
Установка производится БЕЗ снятия и разбора рулевой рейки.
Втулка дублирует штатную втулку, тем самым принимая на себя нагрузку и устраняя стук.
Как показала практика, ВСЕ электрические рулевые рейки на Honda Civic 8 поколения начинают стучать к 100 000 км.
Менять на новую? Стоимость около 80 000 руб.
Ремонтировать? Около 10 000 руб. Устанавли ваются полимерные втулки. И как скоро они износятся?
Менять на БУ? Примерно 20 000 руб. И как скоро и она застучит?
Мы предлагаем решение проблемы БЕЗ СНЯТИЯ и РАЗБОРА рейки за 2500 руб + установка 1000 руб (в среднем по России)
ПРИМЕНИМОСТЬ
Автомобиль: Honda Civic 4D, Honda Civic 4D Hybrid, Honda Civic 4D Type R, Honda Civic 5D, Honda Civic 3D Type R
Поколение: 8-ое
Года выпуска: 2006-2011
Кузов: седан хетчбек
OEM: 53601-SNW-013, 53601-SNB-J04, 53601-SNG-J04, 53601-SNB-P06, 53601-SNB-P07, 53601-SNB-P08, 53601-SND-J94, 53601-SND-P06, 53601-SND-P07, 53601-SND-P08, 53601-SMG-P99, 53601-SMG-P91, 53601-SMG-P95
РЕМКОМПЛЕКТ
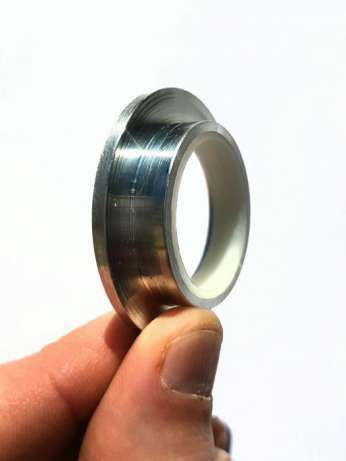
Описание: Внутри фланца УСИЛЕННАЯ МЕТАЛЛИЧЕСКАЯ ВТУЛКА С АНТИФРИКЦИОННЫМ ПОКРЫТИЕМ
Особенность: Многократно надежнее полимеров – капролон, фторопласт и др.
Способ установки: БЕЗ СНЯТИЯ рулевой рейки.
Место установки: с правого торца рулевой рейки
Состав ремкомплекта:
1. Фланец – 1 шт.
2. Инструкция по установке – 1 шт.
Страна производитель: Россия
Примечание: с левого торца рулевой рейки втулка не ставится. При необходимости производится замена прижимного сухаря с пружиной. См. в наших товарах.

Собственно стук в рейке был уже давненько и тут нагрянул ремонт ходовки и так еще по мелочам, вот и до рейки очередь дошла. Купил втулку из дюраля с пластиковой вставкой внутри. Можно было взять в 2 раза дешевле из бронзы, но побоялся чтоб вал не царапала, лучше буду раз в год менять втулку чем попасть на более серьезный ремонт.
Для ремонта кроме втулки нужен будет еще и хомут. Собственно компоненты на фото.
Перед ремонтом много читал постов здесь, наиболее полезные на мой взгляд вот эти:
www.drive2.ru/l/203914/
www.drive2.ru/l/463495554349925391/
www.drive2.ru/l/460222308234095899/
Также в комплекте к втулке идет инструкция по установке.
Ну и еще немного полезных ссылок которые дает продавец/производитель ремонтных втулок (цитата из его объявления):
Втулку брал у этого парня, он из Одессы andriil , объявление его есть на сайте OLX.
После установки втулки все посторонние стуки ушли, за месяц уже проехал с ней почти 3000 км, доволен, так что рекомендую.